MouseBot: How To - IR Object Detection System!
Part 2 Wall Follower Mouse 'Bot Transformation
The Nose Knows...
Last time we took the little mousebot down to it's skeleton, let's put something back. We want our mousebot to look around without actually touching things. It's a solid improvement to the wall follower, it's a good robotics first step and it involves something almost every roboticist has to face: Object Detection and Avoidance. We will use Infrared (IR) generators and detectors to give the wall following mouse a touchless interface to the wall.
Let's make an IR Object Detection system. While we intend to use the module in our little wall follower mouse upgrade, anyone can use it for any "bot." Basically, it's pretty simple if you have the right attitude about just how much functionality to expect from the microcontroller chip you use.
The little teeny 8-bit pic microcontroller in the version of the picAxe chip seemed a fun choice and could give us a whole load of ideas about how to make it even cooler...
Basic IR detection circuit:
Here's the diagram of the nose test circuit...
 |
| From Mouse Bot Tra... |
Driving the IR LED is easy with most chips, AVR, Stamp module, everything you can imagine, but with the m8 picAxe, there's only one way to do it... While that way is pretty neat, you gotta dedicate the whole chip to giving our mousebot the nose to end all noses. That's just what we do in this project. Give the picAxe one job to do and expect it to do that job well...
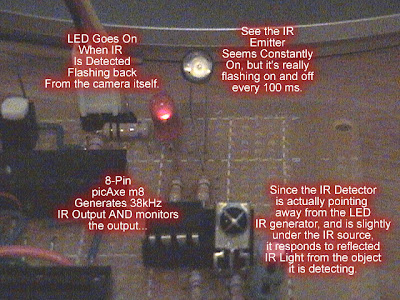
This mouse's nose will have an m8 picAxe chip driving any one of a handful of IR 3-pin IR detector modules while supplying it's own 38 kHz signal to the IR detector... The issue is that when you drive the modulated IR LED you can't stop sending while you check the IR detector because you'd have to shut off the IR you are generating... The m8 picAxe has a pwmOUT command (in Basic) which switches on and continues to run while the picAxe goes on to other instructions...
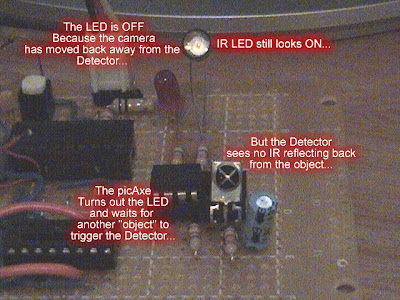
You guessed it, we start up the IR LED, then let it run while the processor takes a peek at the IR Detector output... In our case, if the detector input goes low (meaning it picked up the reflection of an IR signal from the LED, the m8 responds. In this example, it simply turns on an LED, but in the mousebot, it could tell the other motor to run, so it would turn mouse bot away from the refected signal. Without the reflected signal bouncing off the wall, the mousebot motors flip around and the motor switches so the power is applied to the wheel until it turns again and again, wiggling its way along the wall, just like it did before we cannibalized it.
 |
| From Mouse Bot Tra... |
After all that, we intend to get the little mouse bot running without touching the walls, but performing only the simplest function... Wall Following... Since we have a microprocessor running the nose, we might as well take advantage of this by adding some sophistcated features... Like variable sensitivity...

If you drop mousebot in the middle of a big room, he needs to be able to find a wall to follow, so, by using the picAxe, we detune the IR LED's output signal so it still stimulates the IR Detector, but has very little of the power... Thus we can use the sensitivity of the "nose" to determine how far away from the wall the mousebot will wiggle along at... Oh boy, now the little guy can use the smart nose to enhance it's capability and justify the four bucks spent on the picAxe...
We will still have motor control to deal with when we finish this project, but knowing where you are going and what you are looking at will go a long way to improving the Wall Following Mouse Robot...
And here is the code for the test circuit:
#rem
PWMOut pout, Period, DutyCycles
PWMOut 3, 25, 52 ' 38.4 kHz
PWMOut 3, 24, 50 ' 40.0 kHz
PWMOut 3, 23, 48 ' 41.6 kHz
PWMOut 3, 22, 46 ' 43.5 kHz
PWMOut 3, 21, 44 ' 45.5 kHz
PWMOut 3, 20, 42 ' 47.6 kHz
PWMOut 3, 19, 40 ' 50.0 kHz
PWMOut 3, 18, 38 ' 52.6 kHz
PWMOut 3, 17, 36 ' 55.5 kHz
PWMOut 3, 16, 34 ' 58.8 kHz
#endrem
' System resources 08m pinouts and layouts
symbol LED = 0 '(leg 7) Serout/LED
symbol io1 = 1 '(leg 6)ADC1
symbol pout = 2 '(leg 5)ADC2,PWMout2
symbol IRin = 3 '(leg 4)
symbol io4 = 4 '(leg 3)ADC4
'(leg 1 Vdd, leg 8 = Vss, leg 2 = Serial In)
symbol xCnt = b0
'
high LED
pause 1000
Main:
low LED
pwmout pout, 14, 40 '25, 52 ' 26 usec period = 38.4 kHz
' for 40 kHz, use pwm IRsignal, 24, 50
'
' MAX Range about 4-5 ft 26, 50
' 3ft 27, 50
' 6" (closeup) 18, 40
' 2" (eXtreme closeup) 10, 40
Pause 3 ' Begins continuous output PWM
if pin3 = 0 then
high LED
endif
pwm pout, 00, 00 ' turn off the PWM
Pause 100
GoTo Main
Invisible Whiskers
MouseBot is ready for it's "sniffer" or infrared eyes... First we tape down the pc board that will hold the IR LED's that will make the mousebot eyes...
| From Mouse Bot Tra... |
Now with everything in place, make a couple of marks where the eyes will be...
| From Mouse Bot Tra... |
| From Mouse Bot Tra... |
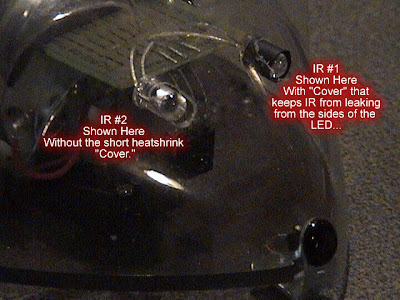
Now we have two eye-marks which we plan to drill out so the IR LEDs protrude from the mouse body... Kinda like little mouse eyeballs... But remember, these are not sensors, these are generators... It's the NOSE that counts, the IR Detector lets the Mouse "sniff" around basking in reflected IR from the eyes...
It's time to fire up the drill...
 |
| From Mouse Bot Tra... |
Now this bot's got eyes...
| From Mouse Bot Tra... |
Almost time to solder, except we need to make a decision about just how much we want this version of mousebot to do... If we need rudimentary motor control, that means one thing, for a more exotic motor control, we'll use another picAxe, this one dedicated to moving the mouse's body around...
| From Mouse Bot Tra... |
Now the soldering is complete!
Oh boy, this means I'm ready to enclose our Infrared Object Detection system into the MouseBot body to make sure the experiment worked, remember IR Detector on the Inside and IR generator LED on the outside of the body?
So I crammed everything into the mouse body and Voila!
Next Step? Well, let's hookup some rudimentary Motor Control for the MouseBot so it can go run around the floor..
No comments:
Post a Comment